
Every year-end, companies have to do a crucial task of counting the inventories they have in the warehouse. The warehouse is piled up with inventory items and keeping their record is very important. A close eye has to be kept on these inventories, regarding what is the system on hand and what is actually present in the warehouse. To keep a track of this, Physical Inventory Count is done.
Physical Inventory Count is the process where a business physically counts its entire inventory. It is performed on a periodic basis to manage the demands and supplies, for potent planning, to evaluate and reconcile inventory quantities and values, count the inventories, post the adjustments and also for audit purposes. It can be done for either of the sub inventories or for the complete inventory organization. Additionally, in Oracle Cloud, one can manage all physical count related tasks from a single counts work area.
The process follows the below 7 step methodology:
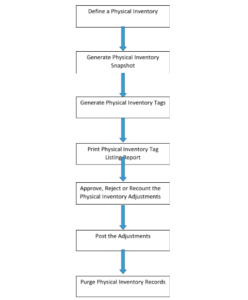
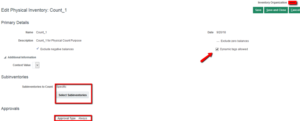
Step 1: Inventory Management → Counts → Manage Physical Inventories
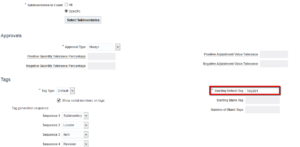
Populate the Create Physical Inventory with the following information: Name, Description, Date, Approvals, Tolerance, Sub-inventories, Allow Dynamic Tags and Exclude Negative Balances.
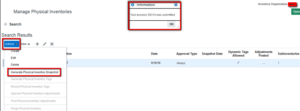
Step 2: Generate Physical Inventory Snapshot
The snapshot is a concurrent program that saves all current item on-hand quantities and costs. This information is the basis for all physical inventory adjustments. All tag counts entered for this physical inventory are compared with the static quantities obtained from the snapshot.
- Step 3: Generate Physical Inventory TagsA Tag is a Label which is used to record the physical counts of inventory items.
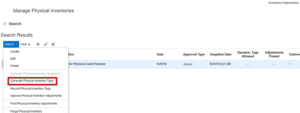
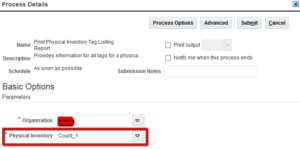
Step 4: Print Physical Inventory Tag Listing Report
Physical Inventory Tag Listing Report – This report lists all the default and blank tags that are generated and all the dynamic tags that entered. The report shows the tag number, item, revision, sub-inventory, locator, lot, and serial number for each tag used in physical inventory. This report is used as the document that is given to the employees performing the counts
Then, download the output and physically record the Quantities
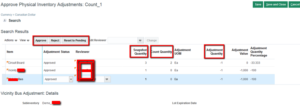
Step 5: Approve Physical Inventory Adjustments
The warehouse or inventory manager then approves all adjustments. This process consists of finding the out of tolerance adjustments, and either approving them or rejecting them.
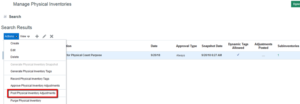
Step 6: Post Physical Inventory Adjustments
After entering all tag counts and approving adjustments that need approval, the process is submitted and this automatically posts physical inventory adjustments. A material transaction is automatically created by adjusting the item quantity. It either debits or credits the adjustment account. If any adjustment is rejected, inventory does not change the system on-hand quantity. If the snapshot of the system on–hand quantity and the count of item match, no adjustment transaction is posted.
Step 7: Purge Physical Inventory
As a very high volume of data regarding the Physical Count is stored, it’s advisable to Purge the Records to avoid lags and system slow down. Either the Complete Physical Inventory can be Purged or just the Tags can be Purged.
One of the biggest challenges for Physical Inventory Count is that all the activities have to be stopped for a day or two until the process is completed.
About the Author

Anuja G. Bharote is working with Trinamix Inc. as a Business Analyst with rich experience in SCM Functional Modules. Her areas of expertise are Inventory, Manufacturing, and Costing.