
Oracle Order Management Cloud manages orders from all channels to get a single view. A flexfield is an extensible set of placeholder fields associated with business objects and placed on the application pages. In applications predefined flexfields are available.
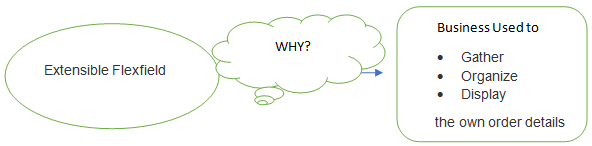
Extensible flexfield can be used to gather, organize, and display the own order details as per the business need in cloud environment, when the predefined data model does not contain those details.
This blog will provide good knowledge to the beginners, users and other consultants to get a good idea of Extensible Flexfields use and its deployment to the Order Management.
Extensible Flexfield Usage.
Extensible flexfield provide us the add on features for the specific orders which can have the various business requirement like consumer details, customer specific details, manufacturing details etc.
Extensible flexfield can be used for multiple Sales Order Object like:
- Header
- Order line
- Fulfillment line
- Fulfillment line detail
- Price adjustment
- Sales credit
- Payment
- Lot serial
- Activity
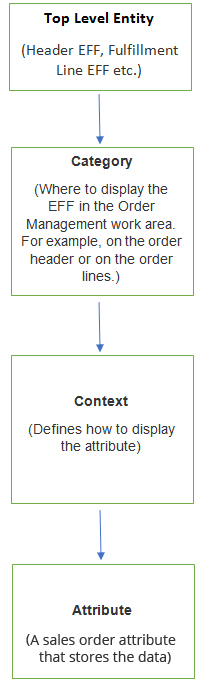
Extensible Flexfield Hierarchies
Setting up EFF Detailed Steps with example
Taking an example to display an extensible flexfield in different Order Management work area according to the following flexfield categories.
DOO_FULFILL_LINES_ADD_INFO (Order line and fulfillment line)
Context Creation
In the Navigator, click Setup and Maintenance.
On the Setup page open Manage Order Extensible Flexfields.

- On the Manage Order Extensible Flexfields page, enter the Fulfillment Line Information, and then click Search.
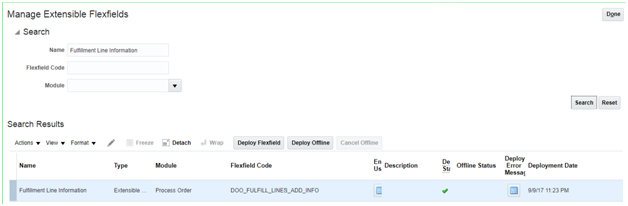
- Click Actions, and then click Edit.
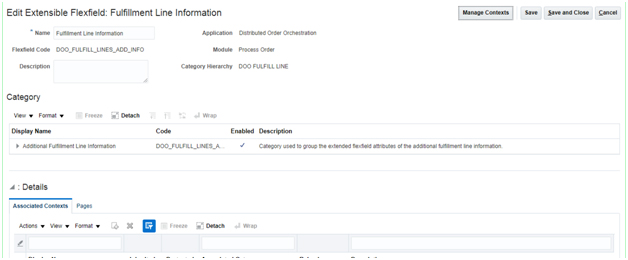
On the Edit Extensible Flexfield page, click Manage Contexts and click Search.
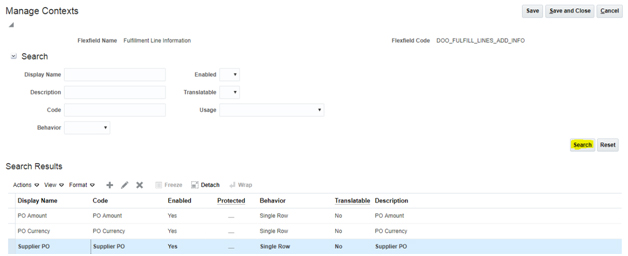
Search Results area will display a list of contexts which are in use.
You can add a new context here as VIN NUMBER (Just for an example)
Click Actions and then click Create.
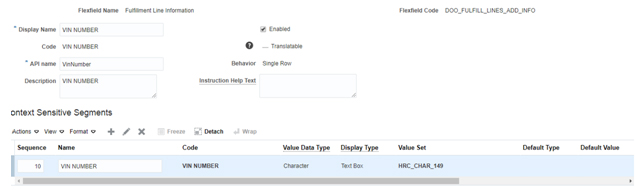
On the Create Context page, set the following values.
| Display Name | VIN NUMBER |
| Code | VIN NUMBER |
| API Name | VinNumber |
| Behavior | Single Row |
On the Context Usages tab, click Actions, click Create, set the following value, and then click Save.
Name: Additional Fulfillment Line Information

In the Context Sensitive Segments area, click Actions, and then click Create.
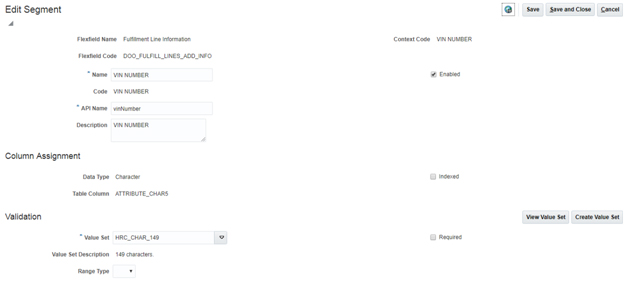
On the Create Segment page, set the following values.
Note: For Column Assignment
Table Column: You can use choose any column. But It is recommended that you choose a column which is not being used to store some other values.
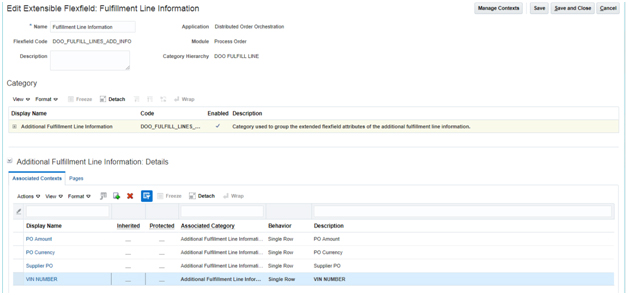
Associate the context with the category
- On the Edit Extensible Flexfield page, in the Category area, in the Display Name column, click the text Additional Fulfillment Line Information.
- Notice that the Category Details area populates the list in the Associated Contexts tab.
- In the Associated Contexts tab, click Actions, and then click Select and Add.
- In the Select and Add dialog, in the Name attribute, enter VIN NUMBER, which is the context created earlier. Then click Search.
- In the search results, immediately above OK, click the row, click Apply, and then click OK.
- On the Edit Extensible Flexfield page, click Save.
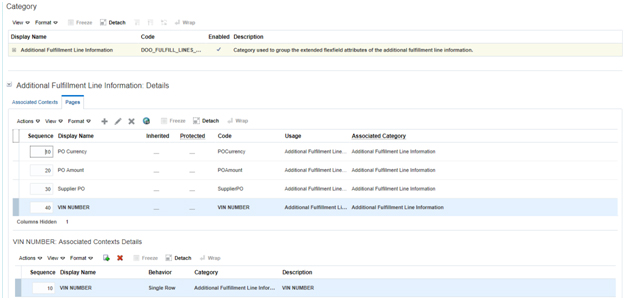
- In the Category Details area, click Pages.
- On the Pages tab, click Actions, and then click Create
Adding the Page to the Category
Use the Pages tab to assign each context to a page, it will reflect where the extensible flexfield displays in the Order Management work area.
The sequence number indicates the sequence that Order Management uses when it displays the extensible flexfield.
Add the page to the category:
- On the Create Page dialog, set the following values, and then click OK.
- Display Name: VIN NUMBER
- Code: VIN NUMBER
- On the Edit Extensible Flexfield page, click Save.
- In the Category Details area, in the Sequence attribute, enter a number.
- Click Actions, and then click Select and Add.
- In the Select and Add dialog, search for the NAME as VIN NUMBER
- In the search results, click the row that contains VIN NUMBER in the Name column, click Apply, and then click OK.
- On the Edit Extensible Flexfield page, click Save and Close.
Please refer below screenshot:
Deploying the Flexfield
Deploy the flexfield:
- On the Manage Extensible Flexfields page, in the Search Results, click the row that includes Fulfillment Line Information, and then click Deploy Flexfield.
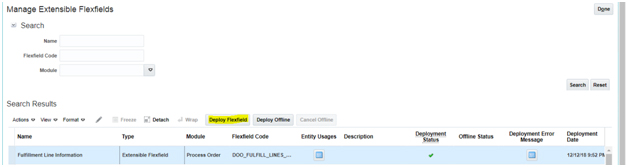
- Wait for deployment to finish, and then click OK
- Verify that Deployment Status contains a check mark, and then click Done.
Publish the Extensible Flexfield:
- In the Navigator, click Scheduled Processes.
- Go to Schedule New Process.
- Search for Publish Extensible Flexfield Attributes, and then click OK.
- Click Submit.
- Wait a few minutes, and then click Refresh again until Status is Succeeded.
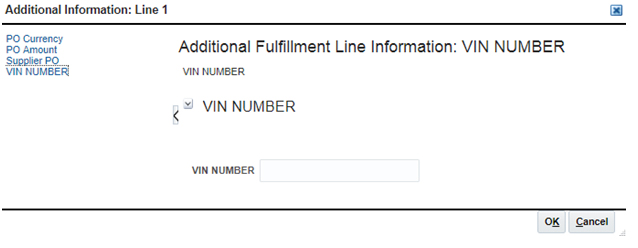
Testing of Setup in Order Management
Verify that the extensible flexfield displays correctly in the Order Management work area:
- In the Navigator, click Order Management.
- Create a new sales order, and then add an order line.
- At the very right of the order line, click the down arrow, and then click Edit Additional Information as below:

Verify that if the display is as expected with respect to the setup done.
Refer the screenshot as below, which is displaying VIN NUMBER:
About the Author

Shashank Jha is the SCM Functional Consultant with experience of 7+ years including Oracle ERP, SCM Cloud, and EDI. He has been part of the various implementation and support projects.